Friday, September 30, 2011

Scenario Based Deployment of RDS in Windows Server 8

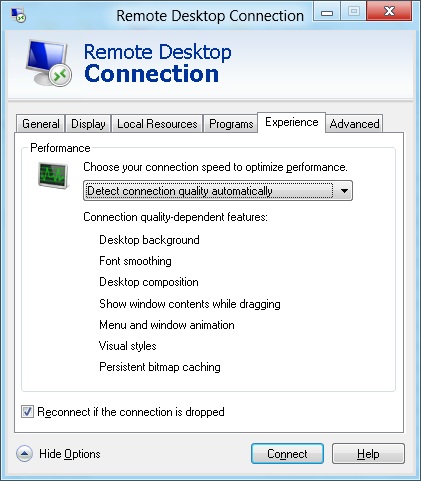
Last week I posted a blog about the Remote Desktop Client on Windows 8, in which I promised to write a follow up post on Remote Desktop Services in Windows Server 8. So here it is. In this blog post, I will focus on the new Scenario Based Deployment of Remote Desktop Services, which is new in Windows Server 8.
The following servers are running within my lab.local environment (all Windows Server 8 developer edition x64).
hostname
roles
RDSH-WIN8-001
Desired role on this machine will be Remote Desktop Session Host (RDSH)
RDGWWA-WIN8
Desired roles on this machine will be Remote Desktop Gateway and Remote Desktop Web Access*
RDCB-WIN8
Desired role on this machine will be Remote Desktop Connection Broker
* it’s not possible at this point to install  the RDGW using the scenario based deployment. It has to be installed separately.

When we logon to a Windows Server 8 for the first time we’re presented with the new Server Manager Dashboard, which looks pretty smooth.
Before we can start our Scenario Based Deployment the Server Manager needs to know what servers you want to manage, and thus install roles on. If you forget this step you won’t be able to select other servers later on in the wizard than the local host that you are running the wizard on. So don’t forget this step! We select Add other servers to manager (option 3) and are presented with the following dialog.We can browse the Active Directory to add servers. Since we know that all the servers that we want to join to this scenario start with “RD” we filter on this text, add the three servers in question, and click finish.


Note that the Server Manager Dashboard now shows the servers we can manage from Server Manager. (See below)


We’re now ready to start our Scenario Based Deployment of RDS.

Since we are going to be installing roles we choose (option 2) add roles.
We are presented with the screen below which is the improved Add Roles and Features Wizard. New in this wizard is that the destination server is show in the upper-right corner. This is because we also have the ability to use this GUI to install roles on remote servers.


We click Next to start the wizard and we’re presented with the screen below.


This brings us to the topic of this blog, the Scenario Based Installation. As explained earlier, this installation type is only available for Remote Desktop Services. (At least in the Developer preview edition). We obviously select Scenario-based Installation and click Next.


Here we have two options. We can choose either a Standard or Quick Deployment. The Quick Deployment option can be used for a single server deployment of Session Virtualization and/or Virtual Desktop Infrastructure. In this case, we want to deploy RDS over multiple servers so we’re going to stick with the Standard deployment. Also note that the previous screens showed the destination server in the upper-right corner. Because we selected a scenario-based installation in the previous dialog we (might) setup RDS over multiple servers which we select later on so the destination server reverts back to No Servers Selected.


In the Select deployment Scenario dialog we again have two options, a VDI or RDS deployment. As you might have guessed we will choose Session Virtualization deployment here (which is RDS).


This dialog sums up the different roles that the wizard is able to deploy including links to additional information per role. Notice that the Remote Desktop Gateway (RDGW) is not part of this Scenario Based deployment. We click next.


The Select RD Connection Broker dialog is used to select the servers that we want to install the RCCB role on. We select the RDCB-WIN8 server and click Next.


On the Select RD Web Access dialog, we have to option to select servers that we want to install the RDWA role on. Note that we have the option to install RD Web Access on the same server as the RD Connection Broker. We choose RDGWWA-WIN8 as the server and click Next.


The Select RD Session Host Servers dialog is used to select the servers that we want to install the RDSH role on. We select the RDSH-WIN8 server and click Next.


The last step of the deployment is the Confirmation dialog. This shows a summary of the different roles that we will be deploying and the machines that we’re deploying these roles on. Note the warning that the server that we install the Remote Desktop Session Host role on needs to be restarted afterwards. (Which is not new compared to Window Server 2008 (R2). We confirm the restart the of RDSH servers by selecting the option and click Deploy.


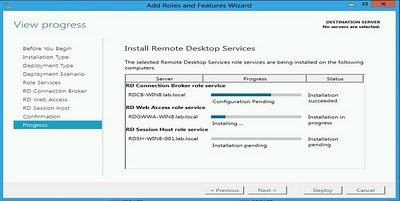
Using the progress dialog that is now shown we can follow the progress of the scenario based deployment.
As we can see later on, the wizard reboots the RDSH server as promised.


I was surprised to see the next dialog that shows a failure.
Apparently, the wizard wants to enable Remote Connections to the all servers using SetAllowTSConnections method. I’m guessing that this refers to this; http://msdn.microsoft.com/en-us/library/Aa383644. I had configured to allow Remote Access to de machines via a GPO setting prior to running this wizard so perhaps the failure is shown because Remote Access is already allowed. What does surprise me is the fact that the wizard also wants to configure Remote Access on the RDWA and RDCB besides the enabling this in the RDSH.

Anyhow, the server manager now has an additional tab Remote Desktop Services. I’ve checked the servers separately and they have the roles installed exactly as expected. Where needed, the prerequisites (like i.e. IIS for RD WebAccess) have also been installed.
This makes the scenario based deployment of Remote Desktop Services complete and successful! The next step will be to further explore the configuration of the separate RDS roles. I’ll devote another post on this subject soon!
To be continued…

Friday, September 23, 2011

Microsoft acquires BHOLD technology assets

It has just been announced that Microsoft has acquired BHOLD technology assets! This will be a very interesting move towards Identity Management and the future of Forefront Identity Management (FIM).

"...Microsoft has acquired certain assets of BHOLD, a leading provider of identity and access governance functionality. BHOLD will continue as an independent entity. The terms of the deal will not be disclosed. Roadmap and licensing will be announced later..."

"...BHOLD’s product capabilities currently augment Forefront Identity Manager by adding identity and access governance functionality including in-depth role management, separation of duties, access certification, and authorization management. These capabilities help to ensure access controls are enforced and that customers meet their controls policies and obligations.
Today, customers use BHOLD’s capabilities to augment FIM by:
  • Managing access rights of people by role to achieve business goals while minimizing risk
  • Increasing end user productivity through self-service role management and access recertification
  • Aiding in risk management and GRC initiatives with respect to identities and their associated access rights..."
Sources:
http://www.microsoft.com/pathways/bhold/default.htm
http://blogs.kuppingercole.com/kuppinger/2011/09/23/microsoft-acquires-bhold-technology-assets/

Tuesday, September 20, 2011

Remote Desktop Client in Windows 8 (version 6.2.8101, RDP 8.0)

I have installed the Windows Developer preview of Windows 8 (client) on my lab. Time to check what’s new in the Remote Desktop Client in Windows 8. See the first screenshot below. Besides some minor design changes the client seems to look the same.


When we take a look at the properties we see that it’s version is now 6.2.8101, and that the client now supports Remote Desktop Protocol 8.0. (This perfectly matches the naming of the OS of course J)


The only visual difference in the Remote Desktop Client is that there is a new option in the experience  tab. We now have the option to choose “Detect connection quality automatically”. This will grant us  some flexibility when it comes to connection speeds and performance.

A list of actual changes inside the Remote Desktop Protocol 8.0 isn’t available yet, but not doubt that it will be related to RemoteFX and better WAN performance. I.e. a recent article on ZDnet shows that RemoteFX will also be available in Remote Apps.
When you start a connection you now also have the option to authenticate using a LiveID and sync personal settings. This would, of course, require additional configuration on the destination server (or client) but Cloud-driven is the word that comes into mind here. Will it mean true User State Virtualization? Or in the Bring Your Own series; BYORP "Bring Your Own Roaming Profile". :-)

Next step will be Installing Windows Server 8 and checking what’s new in the various RDS roles.
To be continued….

UPDATE: Great presentation and slides on what's new in RDS in Windows 8 here:
http://channel9.msdn.com/Events/BUILD/BUILD2011/SAC-642T

Friday, September 9, 2011

Big announcement about upcoming TechMentor Conference, October 10-14, Las Vegas

The TechMentor Conference is coming soon in Las Vegas, and this blog, as a offical social media supporter of the event, have information to share with you that won’t be officially announced until Monday – so you’re the first to know!
Coming up October 10-14 at the Planet Hollywood Resort & Casino, TechMentor is the place where IT pros go to learn tips, tricks and solutions to everyday problems – straight from today’s top IT experts. Session tracks include:
The big announcement: Due to an overwhelming number of requests, the Early Bird discount of $200 is being extended one more week to Friday, Sept. 16th! TechMentor isn’t announcing this officially until Monday, Sept. 12th, but they’ve provided me with this information to share with you early!
So, if you want to brush up your skills, boost your knowledge and supercharge your IT investment (or, you just need an excuse to go to Vegas), TechMentor is your best bet. Register today to save $200: http://bit.ly/TMLVReg

“Allow Logon through Terminal Services” GPO and the “Remote Desktop Users” group.

In case you're confused about the GPO setting “Allow Logon through Terminal Services” and the security group  “Remote Desktop Users”, a new blog post by the Ask the Performance Team was just posted on blogs.technet.com on this subject. It provides a clear explanation on the differences and the combination of those two settings.

"...I am sure many of you are already familiar this GPO and this group. But still there has been some confusion around whether you should be using the GPO for allowing the user to RDP to the server or should be using the Remote desktop users group or both. And at times, even what to choose between them and what is the best recommended practice.

Hence I wanted to provide a short simple explanation about this group policy and the user group and how they are interrelated.

To start with, there are two types of user rights; Logon rights & Privileges. In simpler terms these are:
1) Remote Logon: rights to machine
2) Logon: privileges for access to the RDP-TCP Listener

These play the vital part in allowing an RDP session to the server.
When a user is able to validate the above two conditions successfully, only then is the user provided with a successful RDP connection to the server.

The Remote Logon is governed by the “Allow Logon through Terminal Services” group policy. This is under Computer Configuration\Windows Settings\Security Settings\Local Policies\User Rights Assignment.
By default, the Administrators and Remote Desktop Users groups are given remote logon rights. So, users who are a part of these groups will be authorized to logon remotely to the server.

Now, if you have a user account which is not a part of the Administrators or the Remote Desktop Users groups and you go ahead and add him to the GPO for “Allow Logon through Terminal Services”, they will still not be able to create a successful RDP connection to the server. The reason being that adding a user to this GPO only authorizes him for a Remote Logon to the server but does not give him the permissions to connect to the RDP-Listener.

Now comes into play the Logon privileges for the RDP-Listener. Once the user is authorized for remote logon his privileges to connect to the RDP-Listener is verified. If the user has permissions on the listener then the connection is successful. These permissions can be verified from RDP-TCP Listener properties..."
Source: http://blogs.technet.com/b/askperf/archive/2011/09/09/allow-logon-through-terminal-services-group-policy-and-remote-desktop-users-group.aspx

Thursday, September 8, 2011

Quest releases the free Quest vWorkspace Desktop Optimizer

Great news! Quest Software has just released the free Quest vWorkspace Desktop Optimizer. It looks very promising. For details, see below.

"...One of the biggest advantages that our customers see when they choose to use VDI as their desktop virtualization technology of choice is simplicity. In their current environment they have mastered the art of creating, deploying and managing a Windows desktop operating system and choosing VDI allows them to reuse all of that knowledge. Blindly deploying entirely the same Windows desktop image that was used for the physical desktops is a little naive though. Running Windows in a VDI environment requires a decent amount of optimizing. This optimizing is nothing new. We have been optimizing SBC environments for over ten years now and many of things that we learned there (the hard way) apply equally to VDI environments.
We have created a piece of software that contains our entire ‘optimizing knowledge’ called the Quest vWorkspace Desktop Optimizer and we have decided to make it available to the desktop virtualization community, completely free of charge!.."

Source: http://communities.quest.com/community/vworkspace/blog/2011/09/08/introducing-the-free-quest-vworkspace-desktop-optimizer

RD Gateway and logon attempt failed errors

A new blog post by the Remote Desktop Services team blogs.msdn.com discusses fixing the logon attempt failed error when trying to connect to a RDS farm through the RD Gateway.


"...To resolve this issue, locate the HTTP redirection setting and disable it:

1.In Server Manager, on the RD Gateway server, open Internet Information Services (IIS) Manager.
2.In the IIS navigation tree, expand the server and the sites, and then select Default Web Site.
3.In the middle pane (the settings area), double-click HTTP Redirect.
4.Clear the Redirect requests to this destination check box.


After completing this, single sign-on was working externally as well, but the question remained: “How can I enable the redirection?” I didn’t want to manually type in http://contoso.com/rdweb because I wanted to use http://contoso.com/ instead. After doing some research and getting help from my colleagues, I found that it could be done by just making a small change, detailed in the following steps.

To redirect HTTP:
1. Open IIS Manager.
2. Go to the RD Web Access website (by default, it’s the “Default Web Site”).
3. In the middle pane, click HTTP redirect.
4. Select the Redirect requests to this destination check box, and type the address for your website; for example: http://contoso.com/rdweb.
5. In the Redirect Behavior section, select the Only redirect requests to content in this directory (not subdirectories) check box.
6. Apply settings...."

For the complete blog post see:
http://blogs.msdn.com/b/rds/archive/2011/09/07/how-to-troubleshoot-logon-attempt-failed-messages-when-connecting-through-rd-gateway.aspx

Wednesday, September 7, 2011

Windows Server 2008 R2 stops responding when an application performs many I/O operations to a network share

A new hotfix has been released that might be interesting if you publish applications on a Remote Desktop Session Host 2008 R2 server that heavily use network shares.

Details, see below.

Article ID: 2582112 - Last Review: September 7, 2011 - Revision: 1.0
Windows 7 or Windows Server 2008 R2 stops responding when an application performs many I/O operations to a network share

Consider the following scenario. You use an application to access a network share from a computer that is running Windows 7 or Windows Server 2008 R2. The application performs many I/O operations to the network share. In this scenario, Windows may stop responding.
This issue occurs because of a new behavior of the Server Message Block (SMB) mini-redirector (mrxsmb.sys) in Windows 7 and in Windows Server 2008 R2.

In Windows 7 and Windows Server 2008 R2, a power request object is created and then destroyed for every SMB network file operation. When an application performs heavy I/O to the network share, many threads that read or write to the network share create many power request objects. Therefore, the Power service cannot process the power request objects as fast as they are generated.

Friday, September 2, 2011

GPO "Limit the size of the entire roaming user profile cache" not working

This fix has been out for a few weeks, but for some reason I seem to have missed it. Allthough personally I have never had to configure this GPO setting, there has been released a bug fix for the setting "Limit the size of the entire roaming user profile cache". According to the KB, configuring this GPO doens't seem to work due to incorrect calculation logic.

Details below:

Article ID: 2575946 - Last Review: August 10, 2011 - Revision: 1.0
"Limit the size of the entire roaming user profile cache" Group Policy setting does not work in Windows Server 2008 R2

Consider the following scenario:
  • You install the Remote Desktop Session Host role service on a computer that is running Windows Server 2008 R2.
  • You enable the following Group Policy setting:
    Computer Configuration\Policies\Administrative Templates\Windows Components\Remote Desktop Services\Remote Desktop Session Host\Profiles\Limit the size of the entire roaming user profile cache
  • You configure some users to use roaming profiles when they log on to the computer.
In this scenario, the Limit the size of the entire roaming user profile cache Group Policy setting does not work. When the size of the roaming user profile cache exceeds the maximum size that you have specified, the oldest roaming profiles are not cleared. This behavior causes the roaming user profile cache to consume more disk space than expected.

Source: http://support.microsoft.com/kb/2575946

Check Remote settings the quick way - systempropertiesremote.exe

Just a quick note: This is a shortcut in the "one to remember category"! I knew it existed somewhere, but somehow I never took the time to actually start using it.

Running systempropertiesremote.exe from a command line or from search box in your start menu takes you straight to the Remote tab of the system properties! That actually saves saves you 5 mouse clicks if you’re going there to classic way via the start menu

Thursday, September 1, 2011

Configuring a RemoteApp on Windows 7

As you might know, RemoteApp programs can be configured on Windows Server 2008 (R2). When end-users access these RemoteApp programs they, from the end-users perspective, appear to be running locally.

Configuring these RemoteApp programs on a Windows 7 machine is less frequently seen. It can be done relativly simple however. Benny Trisch explains the procedure is one of his blogposts here:

http://blog.drtritsch.com/?p=176

Credits to Dr. Trisch for the simple guide!

The first step is to activate RemoteApp on Windows 7 by setting the Registry key HKLM \SOFTWARE \Microsoft \Windows NT \CurrentVersion \Terminal Server \TSAppAllowList: fDisabledAllowList to the value 1.

The next step is to create a key for each RemoteApp program: HKLM \SOFTWARE \Microsoft \Windows NT \CurrentVersion \Terminal Server \TSAppAllowList \Applications \<Appname>. Add a string named “Name” and the value “Appname”. Add a string named “Path” and the value “C:\Windows\System32\Appname.exe”.


The last step is to create an RDP file on the client side. The RDP file must include the following entries:
  • full address:s:<VM-Adresse>
  • disableremoteappcapscheck:i:1
  • alternate shell:s:rdpinit.exe
  • shell working directory:s:
  • remoteapplicationprogram:s:||<Appname>
  • gatewayhostname:s:
  • remoteapplicationname:s:Appname.exe
  • remoteapplicationcmdline:s: