INTRODUCTION
Microsoft Azure RemoteApp is all about delivering your Win32 ‘legacy applications’ from the cloud to any device, any location at any time. While RemoteApp technology itself is not new and has been shipping since Windows Server 2008, Azure, however, makes it a truly turnkey, and as a Service, solution. Basically you bring your applications and your identities, and Azure RemoteApp provides you with a GUI inside the Azure Portal to configure the delivery of those applications, including PowerShell support.
Currently you provide your custom application landscape by installing all your applications in a RD Session Host Template image. There are 2 ways to provide that Custom Template to Azure. First, you can create the image on premises and upload it entirely to Azure. Depending on you upload bandwidth and the size of your image, this can be a very time consuming task. My advice would be to use the latest option, which is creating the RD Session Host Template image in Azure IaaS. Azure Provides an IaaS template that is already prepared and optimized for Azure RemoteApp, and this saves you from having to upload an entire image for every application update you do. Microsoft providing a more containerized solution to provide custom applications to Azure RemoteApp, seems like the next future step.
Since we provide a single RD Session Host image for each Application Collection in Azure, every user will be presented with a session on a RD Session Host server based on the same image, including the same application landscape. Some of the challenges with this approach;
- Ensuring application license compliance, for example you may not have purchased a Visio License for every user
- A more granular control to for example Office add-ins, browser plugins, fonts et cetera
- Simply fully hiding an application based on authorization, rather than just preventing access
Although you can go ahead and create lockdown policies to prevent access to certain applications leveraging for example AppLocker, this can be time consuming task. And also, out of the box Microsoft technologies like AppLocker deny access, resulting in error messages when a user tries to access them.
It should be no surprise that there are many 3rd party solutions out there that do application layering, application containerization, application virtualization etc.
In this blog post I’m describing my experience in adding FSLogix Apps to control the application landscape of Azure RemoteApp. If you’re not familiar with FSLogix Apps;
 …FSLogix Apps is a software agent that enables virtual desktop administrators to massively reduce the number of Windows Gold images, easily manage per-user applications, optimize license costs while assuring compliance, and eliminate some of their biggest problems in VDI and RDSH…”
I’m describing three common scenarios which I tested where FSLogix adds real value to (Azure) RemoteApp.
EXAMPLE 1 USING FSLOGIX TO HIDE CRM OUTLOOK PLUGIN FOR CERTAIN USERS
EXAMPLE 2 USING FSLOGIX TO HIDE VISIO FOR SPECIFIC USERS
EXAMPLE 3 USING FSLOGIX TO USE DIFFERENT JAVA VERSIONS FOR DIFFERENT WEBSITES
But first let’s briefly cover some basic steps in Azure RemoteApp and cover the installation of FSLogix.
PROVISIONIG THE RD SESSION HOST TEMPLATE
INSTALLING CUSTOM APPLICATIONS
After logging on the created VM in Azure I have installed several applications to be able to test drive FSLogix Apps. In this case I have installed
Microsoft Office 2013
Microsoft Visio 2013
Microsoft CRM 4.0 Outlook plugin
Java version 6u45
Java version 8u45
INSTALLING FS LOGIX APPS
FSLogix is known for its unique, extremely small footprint in their area. Basically the only thing you need is an agent on the RD Session Host and XML files to instantly configure your desired settings. The installation of the agent is literally 3 dialogs.
After the installation of the agent, you install the Rule Editors that allow for easy creation of the configuration files.
EXAMPLE1 USING FSLOGIX TO HIDE CRM OUTLOOK PLUGIN FOR CERTAIN USERS
This is a common scenario where you install the CRM Outlook plugin on a RD Session Host but would like to have it be only available to certain users. Ultimately, making it fully invisible to others. To do this we open up the FSLogix Apps RuleEditor and create a new Rule and provide the name ‘Dynamics CRM 2015 for Microsoft Outlook’.
We then select ‘Microsoft Dynamics CRM 2015 for Microsoft Outlook’ from the installed programs that the editor discovered and click scan.
The editor will now scan folders, registry et cetera and create hiding rules for you. After that you can, if needed, add, remove or modify any rule.
At this point you can test the rule using the logged on user to instantly see the result and test the experience prior to assigning it specific users.
The next step is to assign the CRM Outlook plugin to specific users. You can do this be either applying the hiding to a specific user or group, or not apply it to a specific user or group. In this case I will set it to not apply to the GG_CRM_Outlook_Users group. But this can basically be any local or Active Directory User, Group or even a specific a process, network location, or Organizational Unit.
Note that since this a RD Session Host template, it’s not yet joined to the domain, we can however still enter the desired group name and domain, we just need to make sure that the naming is 100% correct, since the group name is obviously not checked at this point.
At this point the rule editor has created the necessary xml configuration files, by default in C:\Users\<username>\Documents\FSLogix Rule Sets but you can have them created anywhere you want.
The final step is to simply copy these files to the location where the FSLogix agent actively scans for new or updates configuration files. By default this is C:\Program Files\FSLogix\Apps\Rules.
The copy action itself can be done any way you want. You can manually copy the files in the Azure RemoteApp RD Session Host template prior to using it for Azure RemoteApp, however, the most flexible way would probably be to place the configuration files using a Computer GPO.
Because a Hybrid Deployment of Azure RemoteApp actually results in your RD Session Host servers being added to your (on-premises) Active Directory you can leverage GPO and create a copy action like below. Or optionally use any other management solution you’re currently using. Below is an example of such a GPO File Preference, in this case I’ve created two GPO File Preferences to copy both the .fxa and the .fxr file.
SYSPREP AND PREPARE THE RD SESSION HOST TEMPLATE
In order to be able to use this RD Session Host template as a template image for Azure RemoteApp we need to sysprep it. Because we’re using the optimized Azure RemoteApp template image in IaaS, we can perform this action by running the ValidateRemoteAppImage.ps1 script that is being placed on the desktop.
After the VM is shutdown, we capture it to be able to select it later on in the Azure RemoteApp Collection.
UPDATING THE AURE REMOTE APP COLLECTION
In this case I’m reusing a Azure RemoteApp collection which I created previously, and within that collection a select the newly created template image including the FSLogix agent.
TESTING THE RESULTS
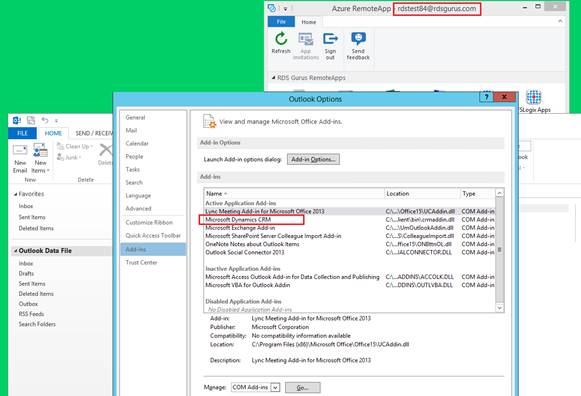
After the Azure RemoteApp collection has been updated with the latest image, we’re ready to test. First lets log on with a user (rdstest84) who is a member of the GG_CRM_Outlook_Users group.
When we launch Outlook as a RemoteApp as this user, the CRM plugin dialog pops up that allows the user to further configure the plug in.
And Outlook is opened notice that the Microsoft Dynamic CRM plug in available in the Add-Ins dialog.
Now let’s perform the exact same steps using a user (rdstest83@rdsgurus.com) who is not a member of the group GG_CRM_Outlook_Users. When we open Outlook as a Azure RemoteApp, we are not prompted with the CRM plugin dialog, and when taking a look at the Add-Ins tab, the Microsoft Dynamic CRM plug in is completely invisible to the user.
This is great because we can now deliver Outlook with and without the Dynamic CRM Outlook plugin using the same RD Session Host Template image without having to virtualize or package any application, these applications all run on the base OS.
EXAMPLE 2 USING FSLOGIX TO HIDE VISIO FOR SPECIFIC USERS
This example is also a very common use case I see a lot. Although you as an admin might not be concerned that everyone has access Microsoft Visio (or any other application) if you’re responsible for ensuring application license compliance, you are! In this scenario we will only allow access to Microsoft Visio for a specific group of users (GG_Viso2013_Users).
To do this we open up the FSLogix Apps RuleEditor and create a new Rule, similar to way we performed this in example 1, and provide the name ‘Dynamics CRM 2015 for Microsoft Outlook’. We then select the application ‘Microsoft Visio Professional 2013’ en click scan.
Similar as in example 1, the editor will now scan folders, registry et cetera and create hiding rules for you. After that, you can, if add, remove or modify any rules as needed. For Visio I had to remove some path and registry items that the scan picked up that were not Visio specific but rather Microsoft Office general.
The next step is to assign the CRM Outlook plugin to specific users. You can do this be either applying the hiding to a specific user or group, or not apply it to a specific user or group. In this case I will set it to not apply to the GG_Viso2013_Users group.
Again I’ve created two GPO File Preferences to copy both the .fxa and the .fxr file, but you can use any desired method to get the files in folder that is scanned by the FSLogix Agent.
TESTING THE RESULTS
After the two files have been copied by the GPO, we’re ready to test. First lets log on with a user (rdstest84) who is a member of the GG_CRM_Visio_Users group. With this user we are able to Launch Visio as a Azure RemoteApp. Also, we can see Visio as a installed program when we open up the control panel as this user.
Now let’s perform the exact same steps using a user (rdstest83@rdsgurus.com) who is not a member of the group GG_CRM_Visio_Users. When we try to open Visio as a RemoteApp the system won’t us, and we’re presented with the following error.
And also, we open Control Panel as this user and take a look at the installed programs, Microsoft Visio is not there.
This mean that FXLogix not only denied access to Visio, but complete hides Microsoft Visio for the user, which is great because this makes it very transparent.
There is one caveat there which is related to Azure RemoteApp rather than FSLogix. Currently Azure RemoteApp does not support fine grained assigning of RemoteApps. This means that every user who has access to a App Collection will see every application within that collection. In case of this scenario, using FSLogix we’ve completely hidden Visio for users who are not a member of the specified group. They do not see references to Visio anywhere…except for the Azure RemoteApp client. Since we currently cannot show RemoteApps based on for example group membership Visio will still show up there, although the user is unable to launch it. Hopefully this is something that Microsoft will change in the future. But despite this caveat, FSLogix is able to fully block any access to Visio which means we’re ensuring application license compliance.
EXAMPLE 3 USING FSLOGIX TO USE DIFFERENT JAVA VERSIONS FOR DIFFERENT WEBSITES
Another common example is Java. Many Line of Business (Web) Applications require java to be installed. As an administrator, ultimately you would want a single Java runtime, updated to the latest version. Unfortunately, the reality is different, since not every web application fully works with the latest version of Java. FSLogix offers functionality that allow you to run the latest runtime of Java and make an exception for a specific (web) application, based on the URL, and only allow that URL to use a specified older version on Java.
To demonstrate this I’ve installed 2 versions of Java in the RD Session Host template used by Azure RemoteApp. Java 8 Update 45 and Java 6 Update 45.
To be able to make the exception for a specific URL, we use the FSLogix Java Rule Editor. The interface is again really simple. We create a new Java rule with the type set to URL. We then specify the specific URL we want to run using an older version of Java. For this demo I actually specified the java.com website, because the java.com website contains an option to show the java version that is used. That allows me to confirm the exception. Upon saving this configuration, 2 files are created, an .XML and an .XMLP file.
Similar to the other 2 scenario’s I use a GPO Computer File Preference to copy the files to the folder that is being actively monitored by the FSLogix agent. As soon as the files are there, the FSLogix agent picks up the change and the configuration is made active.
TESTING THE RESULTS
To test this we open the Azure RemoteApp Client and open Internet Explorer as a RemoteApp. Within Internet Explorer we browse to the URL specified to use the older version of Java (Version6 U45). In this case, Java.com and we browse to section that allows us to verify the Java Version we are using.
After clicking Verify Java version we’re presented with the screen below, indicating that we are in fact using the older version of Java! This confirms that the Java rule is correctly working.
To fully prove this, we remove the 2 java rule files from the FSLogix Folder, close and reopen the Internet Explorer Remote App, and here’s the verification we’re now using the latest version of Java!
So using FSLogix we’re able to use the latest version of Java for every (web) application while still being able to support that single application that requires an older version of Java.
CONCLUSION
FSLogix Apps is very powerful yet extremely simple solution. It provides solutions for very common scenarios related to managing the application landscape within a RDS or VDI solution. In this case I’ve only covered 3 scenario’s, but there are obviously many more. Also note the scenario’s above were not strictly bound to RemoteApps in Azure but rather RemoteApps in general and thus can also be applied in on premises environments. What I wanted to point out in this blog post is that FSLogix has the same added value to Azure RemoteApp scenario’s and provides an easy solution for a lot of very common scenarios without making things over complex. That’s why I think Azure RemoteApp and FS Logix Apps are a great match!

 One of the current limitations to Azure RemoteApp compared to a RemoteApp deployment on premises is not having the ability to assign specific RemoteApps to specific uses (fine grained assigning). If a user is a added to a App collection he will see all the applications published to that Collection. This can be confusing to users because they will generally see more applications in the Azure RemoteApp client than the use, and there will most likely also be applications that they are not even authorized to start. Although seeing the application in the Remoteapp client does not mean that can start, it’s still a current limitation you need to be aware of.